Showing posts with label Cisco Unified Communications Manager (CUCM).. Show all posts

Cisco Unified Communications Manager (CUCM) Time Synchronization Approaches.

Posted: Friday, June 28, 2013 by Unknown in Labels:
0

The following information illustrates the two basic approaches for time synchronization when installing Cisco Unified Communications Manager (CUCM) using VMware :

NTP Basics:
-The Network Time Protocol (NTP, RFC 1305) is a simple protocol using UDP port 123. The RFC describes the protocol itself as well as the architectural framework and in-depth implementation recommendations. 

-The NTP architectural framework specifies a hierarchy of time servers using stratum values from one to sixteen to indicate their relative accuracy.

-The most accurate servers using external clocks (GPS receivers are commonly used due to their low cost) are stratum one servers and any server synchronizing itself to a stratum X server advertises itself as stratum X+1 server.

-Internal NTP Server: 
-you can configure an internal NTP server to synchronize time with,if so this internal NTP server could be a Windows machine,Unix machine,Cisco IOS gateway that will be configured as an internal NTP server and when configuring this in a lab environment you will need to use GNS3 and any IOS image that supports the NTP daemon.Use the " ntp master x " where is x is the NTP master stratum number,it's NOT recommended to be higher than 6 so the lower is better also you can use the " show ntp status " command to verify your configuration.

Notice:If you decided to use an internal NTP server for time synchronization there's NO need to configure the CUCM virtual network adapter to Bridged or NAT since you do NOT need any internet connectivity to reach your internal NTP server so usually you will configure it as " Internal " also you must configure the virtual network adapter that will be created on your physical host on the same subnet and to use the same gateway IP address your CUCM is using.

-External NTP Server:
-Another option you can use " External NTP Server ".One of the advantage when using external NTP server instead of internal NTP server is that you do NOT need to use GNS3 and emulate NTP server on a Cisco IOS image anymore.All you need is an internet connectivity to the public NTP pool.

-One of the most popular public NTP pool projects is pool.ntp.org that has more than  (3611) public NTP server around the world in the Global Zone.It's recommended to choose the nearest NTP pool to your country and you will see the available NTP servers list as follows depending on your choice.


-Choose the NTP pool you want to synchronize time with and ping it and now you can use this public IP address as your external NTP server when installing CUCM or any of the Cisco Unified Communications Solutions.


Notice:Since you will synchronize the CUCM time with an external NTP server you must configure the CUCM virtual network adapter to Bridged or NAT to enable your CUCM to reach the NTP server.


Registering SIP Phones With CISCO Unified Communications Manager (CUCM).

Posted: Sunday, June 23, 2013 by Unknown in Labels:
0

The following information illustrates how to register any phone to Call Manager using the SIP protocol:

1-Configure a " SIP Trunk Security Profile " (Optional).
2- Configure an End User.
3- Configure a SIP Phone.
4-Configure a DN number for the End user.
5-Configure the SIP phone.
6-Verify the SIP phone registration.


1-Configure a " SIP Trunk Security Profile " to enforce the SIP End points to authenticate when registering with CUCM (Optional but recommended).

-Go to  System > Security > SIP Trunk Security Profile and check " Enable Digest Authentication " so the SIP phones will NOT be able to register with CUCM without authentication.


2- Configure an End User.

-Go to User Management > End User and click Add New to add a new user.Configure the User ID , Last name , Digest Credential.
Notice: The " User ID "  that will be configured here will be used as your " Authorization name " and the " Digest Credentials " will be used as your " Password " in X-Lite.


3- Configure a SIP Phone.

-Go to Device > Phone and click Add New. In the drop down list select the option for " Third Party SIP Device (Advanced) " and proceed to provision this device.


-At a minimum, you should configure the following settings:
-MAC Address : DEADBEEF0000 (Set it to something unique, it doesn’t matter to X-Lite)
-Device Pool
-Phone Button Template
-Common Phone Tepmlate
-Common Phone Profile
-Location
-Presence Group
-Device Security Profile: Associate the " SIP Trunk Security Profile " if configured.
-SIP Profile
-Digest User ID : Choose the user you have configured before in step 2.


4-Configure a DN number for the End user.

-After saving the phone configuration,now time to configure the DN number,choose the first Line and click Add a new DN.


-Add the extension as you normally would,i'm going to choose 1001 as my DN.

Notice: The DN number that will be configured here will be used as the " User ID " in X-Lite.


5-Configure the SIP phone.

-Now time to configure your SIP Phone as follows :
-The " User ID " will be your " DN " number.
-The " Domain " will be the CUCM IP address.
-The " Password " will be your " Digest Credentials ".
-The " Authorization name " will be your " User ID " in CUCM.


6-Verify the SIP phone registertion.

-Go to Device > Phone and here you can see the phone has been successfully registered with CUCM using the SIP protocol.


Installing CUCM 8.5 ON VMware Workstation.

Posted: Thursday, April 4, 2013 by Unknown in Labels:
0

Installing CUCM on VMware is a straightforward process,only two issues will face you during the installation:

1.The Configuration Of The CUCM NTP Server.
CUCM need NTP  server to synchronize it's time with, you can use external NTP pool or configure your router as internal NTP server -the option we use- to syn with.

2.Upgrading the VMware tools.
The installtion is successful,but you can't get the CUCM administration web page?! this is because you need to upgrade the VMware tools on CUCM to fix any network connectivity issues.

Note:The CUCM VM settings in VMware like this:


Note:In GNS3 i'm using C2691 as NTP server and it's directly connected to the CUCM VM on VMnet1 host only virtual adapter,also the gateway IP address configured on the VMnet1 NIC must be the same gateway IP address configured on the CUCM NIC.

1.Configuring The NTP Server:

HOT.CISCO.LABS#conf t
Enter configuration commands, one per line.  End with CNTL/Z.
HOT.CISCO.LABS(config)#interface FastEthernet0/0
HOT.CISCO.LABS(config-if)# ip address 192.168.1.1 255.255.255.0
HOT.CISCO.LABS(config-if)#no shut
HOT.CISCO.LABS(config-if)#exit
HOT.CISCO.LABS(config)#ntp master 4
HOT.CISCO.LABS(config)#do show ntp status
Clock is synchronized, stratum 4, reference is 127.127.7.1
nominal freq is 250.0000 Hz, actual freq is 250.0000 Hz, precision is 2**18
reference time is C0294593.3646AA33 (00:10:59.212 UTC Fri Mar 1 2002)
clock offset is 0.0000 msec, root delay is 0.00 msec
root dispersion is 0.02 msec, peer dispersion is 0.02 msec

2.Intsalling The Call Manager (CUCM):

Note:The GW IP Address will be the same as the  NTP server IP address.

3.Upgarding  The VM tools Via The Console.

1.From the VMware console enter the command "utils vmtools status" this will tell you the current version.
2.Go to the VMware menu and select VM - Update VM Tools,from the VMware console enter the command "utils vmtools upgrade" Enter "y" and the system will restart after the upgrade.After you are back up run the command "utils vmtools status" to verify the upgrade.The only odd thing that I experienced is after you enter "utils vmtools upgrade" and you enter "y" for yes nothing happens.I needed to press "y" and enter a number of times before the upgrade started.


4.Getting The CUCM Web Administration Page.

Now,you are completely ready to connect to the CUCM administration page,open your browser and connect to https://192.168.1.100/ccmadmin


Note:I can't finish this before telling you about the most important usable commands to troubleshoot any issues:
1."utils ntp status" will show the NTP synchronization status with the NTP server.
2."utils network ping <ip>" to ping any IPaddress.
3."show network eth0" to get INFO about the status of the CUCM NIC.
4."set network status eth0 down" and "set network status eth0 up" to change the status of the CUCM NIC up and down.

Hitler NOT Happy With Unified Communications.

Posted: Tuesday, April 2, 2013 by Unknown in Labels:
0

Hitler : " The RFC for SIP was published in 1996...fourteen years ago!...fourteen years,and we're still fighting baisc interoperatblitiy problems! "


CUCM and Active Directory Integration

Posted: Sunday, March 31, 2013 by Unknown in Labels:
0

Implementing end users in CUCM:
End Users can be added to the CUCM database via three main methods.
1.Manual,one-at-a-time entry.
2.Bulk import using the Bulk Administration Tool.
3.LDAP sychronization (and optional authentication).

CUCM and Active Directory Integration :
1.Intsall LDAP on a Windows Server OS and configure your AD domain,i wil install AD on Windows Server 2008.
2.On CUCM,activate the CISCO DirSync service.
3.Configure the LDAP system.
4.Configure the LDAP directory.
5.Configure LDAP authentication.

1.Intsalling  LDAP on Windows Server 2008 and configuring AD domain:
1.Open Server Manager by clicking the icon in the Quick Launch toolbar, or from the Administrative Tools folder.
2.Wait till it finishes loading, then click on Roles > Add Roles link.
3.In the Before you begin window, click Next.


4.In the Select Server Roles window, click to select Active Directory Domain Services, and then click Next.
5.In the Active Directory Domain Services window read the provided information if you want to, and then click Next.


 6.In the Confirm Installation Selections, read the provided information if you want to, and then click Next.


7.Going back to Server Manager, click on the Active Directory Domain Services link, and note that there's no information linked to it, because the DCPROMO command has not been run yet.
8.Depending upon the question if AD-DS was previously installed or not, the Active Directory Domain Services Installation Wizard will appear immediately or after a short while. Click Next.

9.In the Choosing Deployment Configuration window, click on "Create a new domain in a new forest" and click Next.
 
10.Enter an appropriate name for the new domain. Make sure you pick the right domain name, as renaming domains is a task you will not wish to perform on a daily basis. Click Next.
Note: Do NOT use single label domain names such as "mydomain" or similar. You MUST pick a full domain name such as "mydomain.local" or "mydomain.com" and so on.


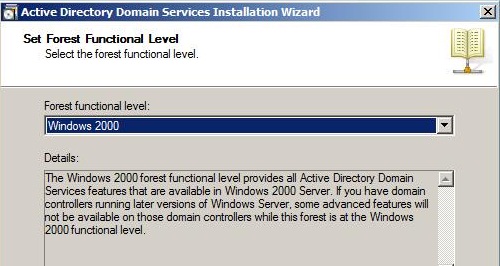
11.Pick the right forest function level. Windows 2000 mode is the default, and it allows the addition of Windows 2000, Windows Server 2003 and Windows Server 2008 Domain Controllers to the forest you're creating.


13.The wizard will perform checks to see if DNS is properly configured on the local network. In this case, no DNS server has been configured, therefore, the wizard will offer to automatically install DNS on this server.


12.Pick the right domain function level. Windows 2000 Native mode is the default, and it allows the addition of Windows 2000, Windows Server 2003 and Windows Server 2008 Domain Controllers to the domain you're creating.


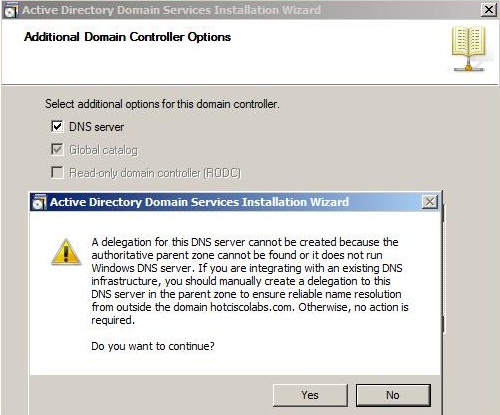
14.You'll probably get a warning about DNS delegation. Since no DNS has been configured yet, you can ignore the message and click Yes.


15.Next, change the paths for the AD database, log files and SYSVOL folder. For large deployments, carefully plan your DC configuration to get the maximum performance. When satisfied, click Next.
16.Enter the password for the Active Directory Recovery Mode. This password must be kept confidential, and because it stays constant while regular domain user passwords expire (based upon the password policy configured for the domain, the default is 42 days), it does not. This password should be complex and at least 7 characters long. I strongly suggest that you do NOT use the regular administrator's password, and that you write it down and securely store it. Click Next.

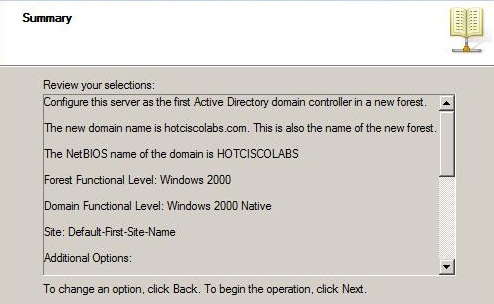
17.In the Summary window review your selections, and if required, save them to an unattend answer file. When satisfied, click Next.


18.The wizard will begin creating the Active Directory domain, and when finished, you will need to press Finish and reboot your computer.
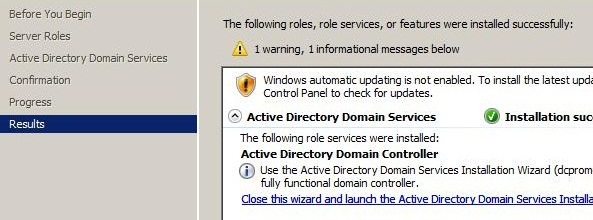
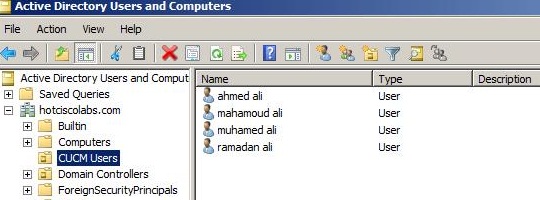
19.Open Active Directory Users and Computers and creat an OU and creat some users.


Note:In CUCM,you will be asked about the OU Distinguished Name/LDAP User Search Base to poll the users from it.to me it's hard to remember how to write this DN,so you can open the "ADSI Edit" tool that will preview the Distinguished Names of every Object in your domain.
 2.Configuring  CUCM to synchronize with LDAP:

1.Activate the CISCO DirSync service.
On CUCM,activate the CISCO DirSync service from CUCM OS Servicablitiy.
2.Configure the LDAP system.
Go to System then LDAP then LDAP System.
3.Configure the LDAP directory.
Go to System then LDAP then LDAP Directory.


Choose "Perform Full Sync Now"to pull the users from the target OU.


Go to User Managment then End Users to be sure that the synchronization was successful.

Note:LDAP synchronization will pull the users from AD to CUCM but the authentication will be done by CUCM for this reason when you enable LDAP synchronization you can change the users password from CUCM as you can see in the next pic.If you want users to authenticate from AD you must enable LDAP authentication.


6.Configure LDAP authentication.
Go to System then LDAP then LDAP Authentication.

Note:look and tell me what's the difference ?!the "Password" and "Confirm Password" fields have been gone and only IP Telephony attributes can be managed from CUCM when you enable LDAP authentication because the authentication process will be done by the LDAP server.